Hello everyone! I'm back today with two cards and a little tutorial for a shaker card. They are both designed for Memories Trend Design Team.
Do you like them?
The first one is pretty simple. I used a lovely Sizzix die to create it, plain color cardstock in various colours, a border punch, a piece of craft cardstock which I distressed for the background, a round corner chomper and a white gel marker.
For this card I used:
- Sizzix die trailer
- Kaisercraft Honey Chai Paper pack
- White, light green and craft cardstock
- Cropadile corner chomper
- Martha Stewart border punch
- Crafty foam tape
- Distress inks (broken china, faded jeans, shabby shutters, peeled paint)
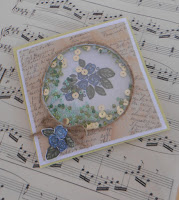
The second card is a shaker card (it has a gap between two transparencies where you can put beads or other little things that move when you shake the card). You can see the instructions below.
Here are the cardstocks' and transparencies' measurements in inches.
You glue your patterned paper on the white cardstock. Then you find the center and you draw a 3' diameter circle and you cut it with a cutting knife.
You put the cardstock with the opening on the base of your card (the front piece of the card), you draw a same circle and you cut it with a cutting knife.
Then you take the cardstock with the patterned paper and you glue one of your transparencies on the back of it.
After that you cut little pieces of your foam tape and you glue them around your circle so that you don't leave any gaps.
When you finish with that you take little beads, sequins or whatever you want (you can also put glitter) on your transparency trying to put them away from the perimeter of your circle.
Then you glue the second transparency on the upper side of the foam tape. Afterwards you put glue behind the second transparency and you glue all this "sandwich" on the base of your card like you see below.
You can trim your circle with a ribbon or a cord using your glue gun.
Do you like them?
For this card I used:
- Sizzix die trailer
- Kaisercraft Honey Chai Paper pack
- White, light green and craft cardstock
- Cropadile corner chomper
- Martha Stewart border punch
- Crafty foam tape
- Distress inks (broken china, faded jeans, shabby shutters, peeled paint)
The second card is a shaker card (it has a gap between two transparencies where you can put beads or other little things that move when you shake the card). You can see the instructions below.
Here are the cardstocks' and transparencies' measurements in inches.
You glue your patterned paper on the white cardstock. Then you find the center and you draw a 3' diameter circle and you cut it with a cutting knife.
You put the cardstock with the opening on the base of your card (the front piece of the card), you draw a same circle and you cut it with a cutting knife.
Then you take the cardstock with the patterned paper and you glue one of your transparencies on the back of it.
After that you cut little pieces of your foam tape and you glue them around your circle so that you don't leave any gaps.
When you finish with that you take little beads, sequins or whatever you want (you can also put glitter) on your transparency trying to put them away from the perimeter of your circle.
You can trim your circle with a ribbon or a cord using your glue gun.
After that I glued a white piece of cardstock on the inside of my card and I stamped a flower bouquet from this beautiful Sizzix stamp and die set on the center of the cardstock. I coloured the image with my Copic markers. Then I stamped the flower border on another piece of white cardstock, I coloured the image and I cut 3 roses and 3 leaves with the cutting dies (I used the little dies to cut the elements separately). With these I decorated the cover of my card.
For this card I used:
- White and light green cardstock
I hope you liked my cards and got some inspiration! Thank you for the visit! I would love to see your comments! Have a nice week!















wdwsfdcsfcvdgvdfgbv
ΑπάντησηΔιαγραφήصيانة افران بمكه